Characterising LW-PLA Filament
Tuning colorFabb LW-PLA filament for the Prusa Mini
I’ve bought some LW-PLA to use for some potential future projects, but I want to get the best out of it - so I need to determine the best print settings for my Prusa Mini. I’ll explain below my findings and how you can configure testing to get the best print settings for your printer.
If you aren’t familiar, LW-PLA is a type of foaming PLA filament that expands when exiting the nozzle. This creates air bubbles within the deposited filament which greatly reduces the density of the resulting print, allowing for much lighter prints to be produced without a significant impact on print strength.
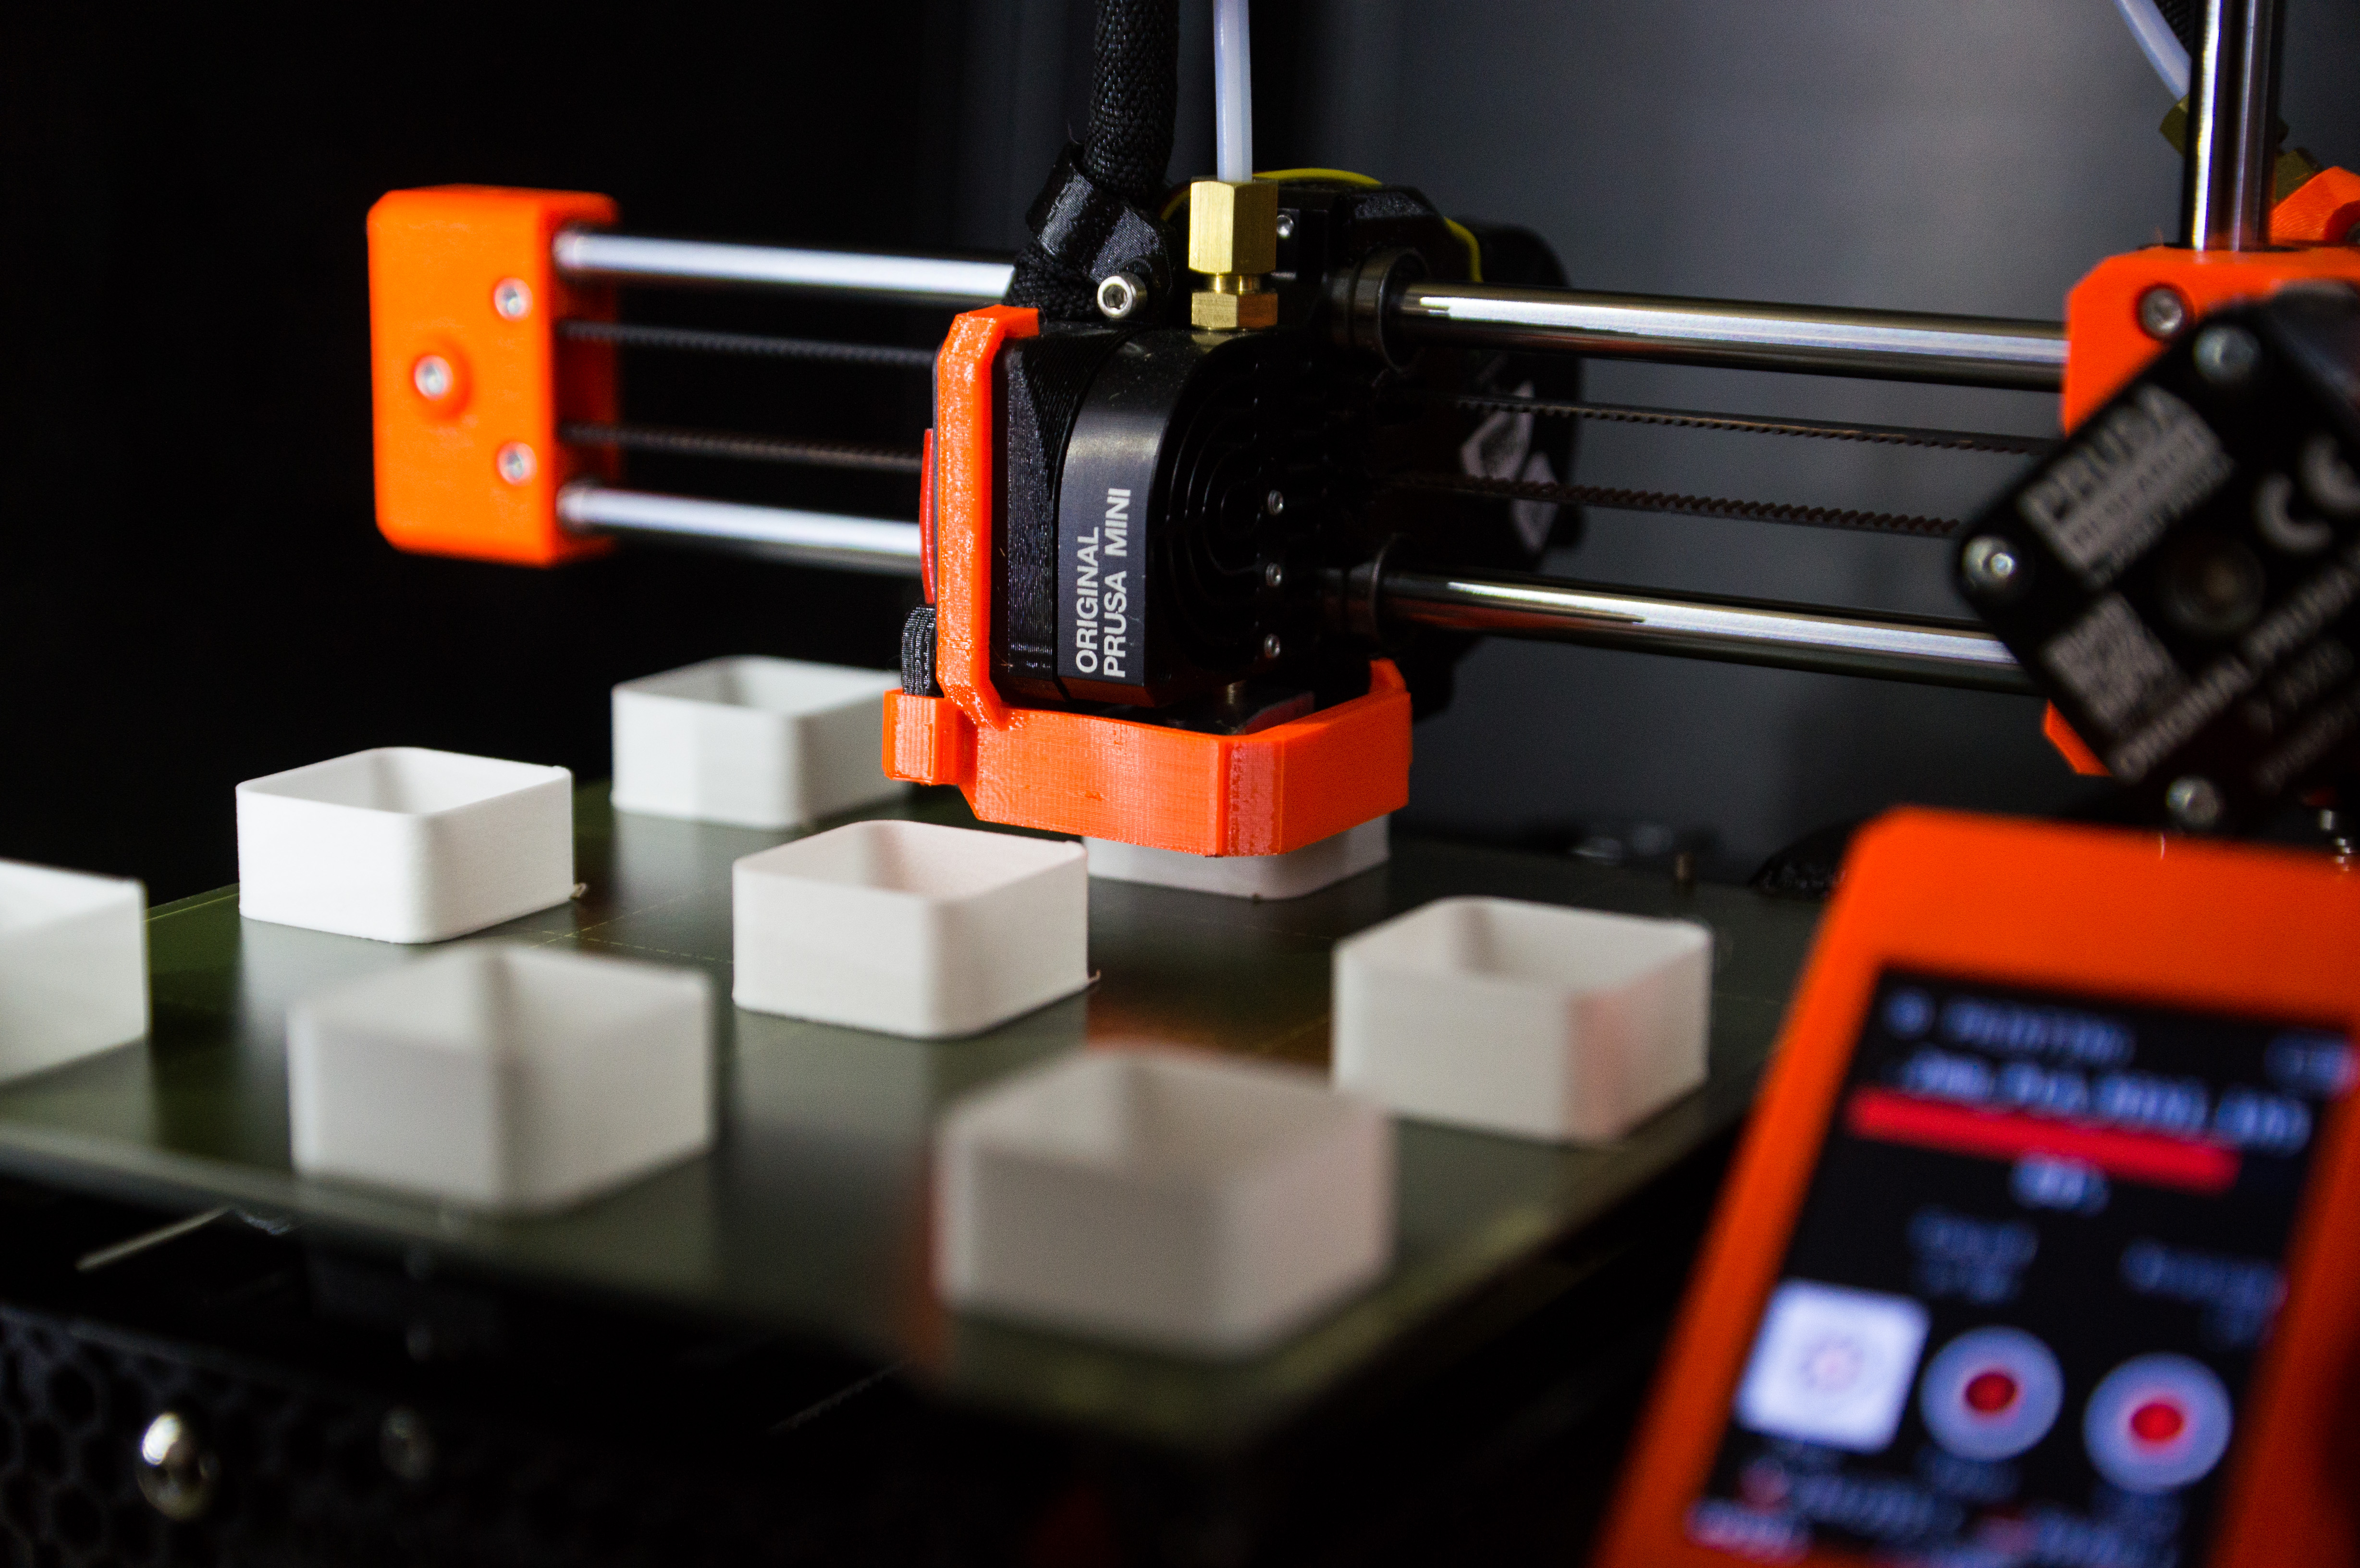
All my testing is run on my stock Prusa Mini+, with PrusaSlicer used to create the Gcode files. If you also have a stock Prusa Mini and are looking to use LW-PLA, my settings may be a good starting point! The filament I am using is colorFabb LW-PLA Natural.
Extrusion Multiplier
As LW-PLA is extruded, it expands with an expansion ratio dependent on the nozzle temperature and extrusion rate, the extrusion rate being primarily driven by print speed. The slicer calculates the amount of required extrusion to meet the wall thickness required based on an assumed expansion ratio of 1 (i.e zero expansion during extrusion), as this is how the vast majority of filaments behave. Therefore, when compared to standard PLA, LW-PLA produces thicker walls than expected with standard print settings.
In this case, we can correct the wall thickness by changing the extrusion multiplier, also referred to as Flow (Ratio) in other slicing software. This parameter is expressed as a percentage and determines how much filament is extruded during each movement of the nozzle, with a smaller percentage causing less filament to be extruded. Using a multiplier of less than 100% will reduce the resulting wall thickness.
However, the expansion ratio of the filament is affected by multiple factors, primarily the nozzle temperature and print speed, so a calibrated extrusion multiplier is only valid for the settings used during calibration - plus a very small window either side.
PrusaSlicer allows for individual print settings per object on the print bed, so copies of the test print can be printed with only a single variable changed, in this case the extrusion multiplier. The print speed and wall thickness were kept constant for all parts at 10 mm/s and a single wall of 0.45 mm respectively, and temperatures between 200 and 240 degrees C with an increment of 5 degrees were tested. Each test object is printed in full before moving on to the next. I ran the full print file twice and averaged the results, which are shown below.
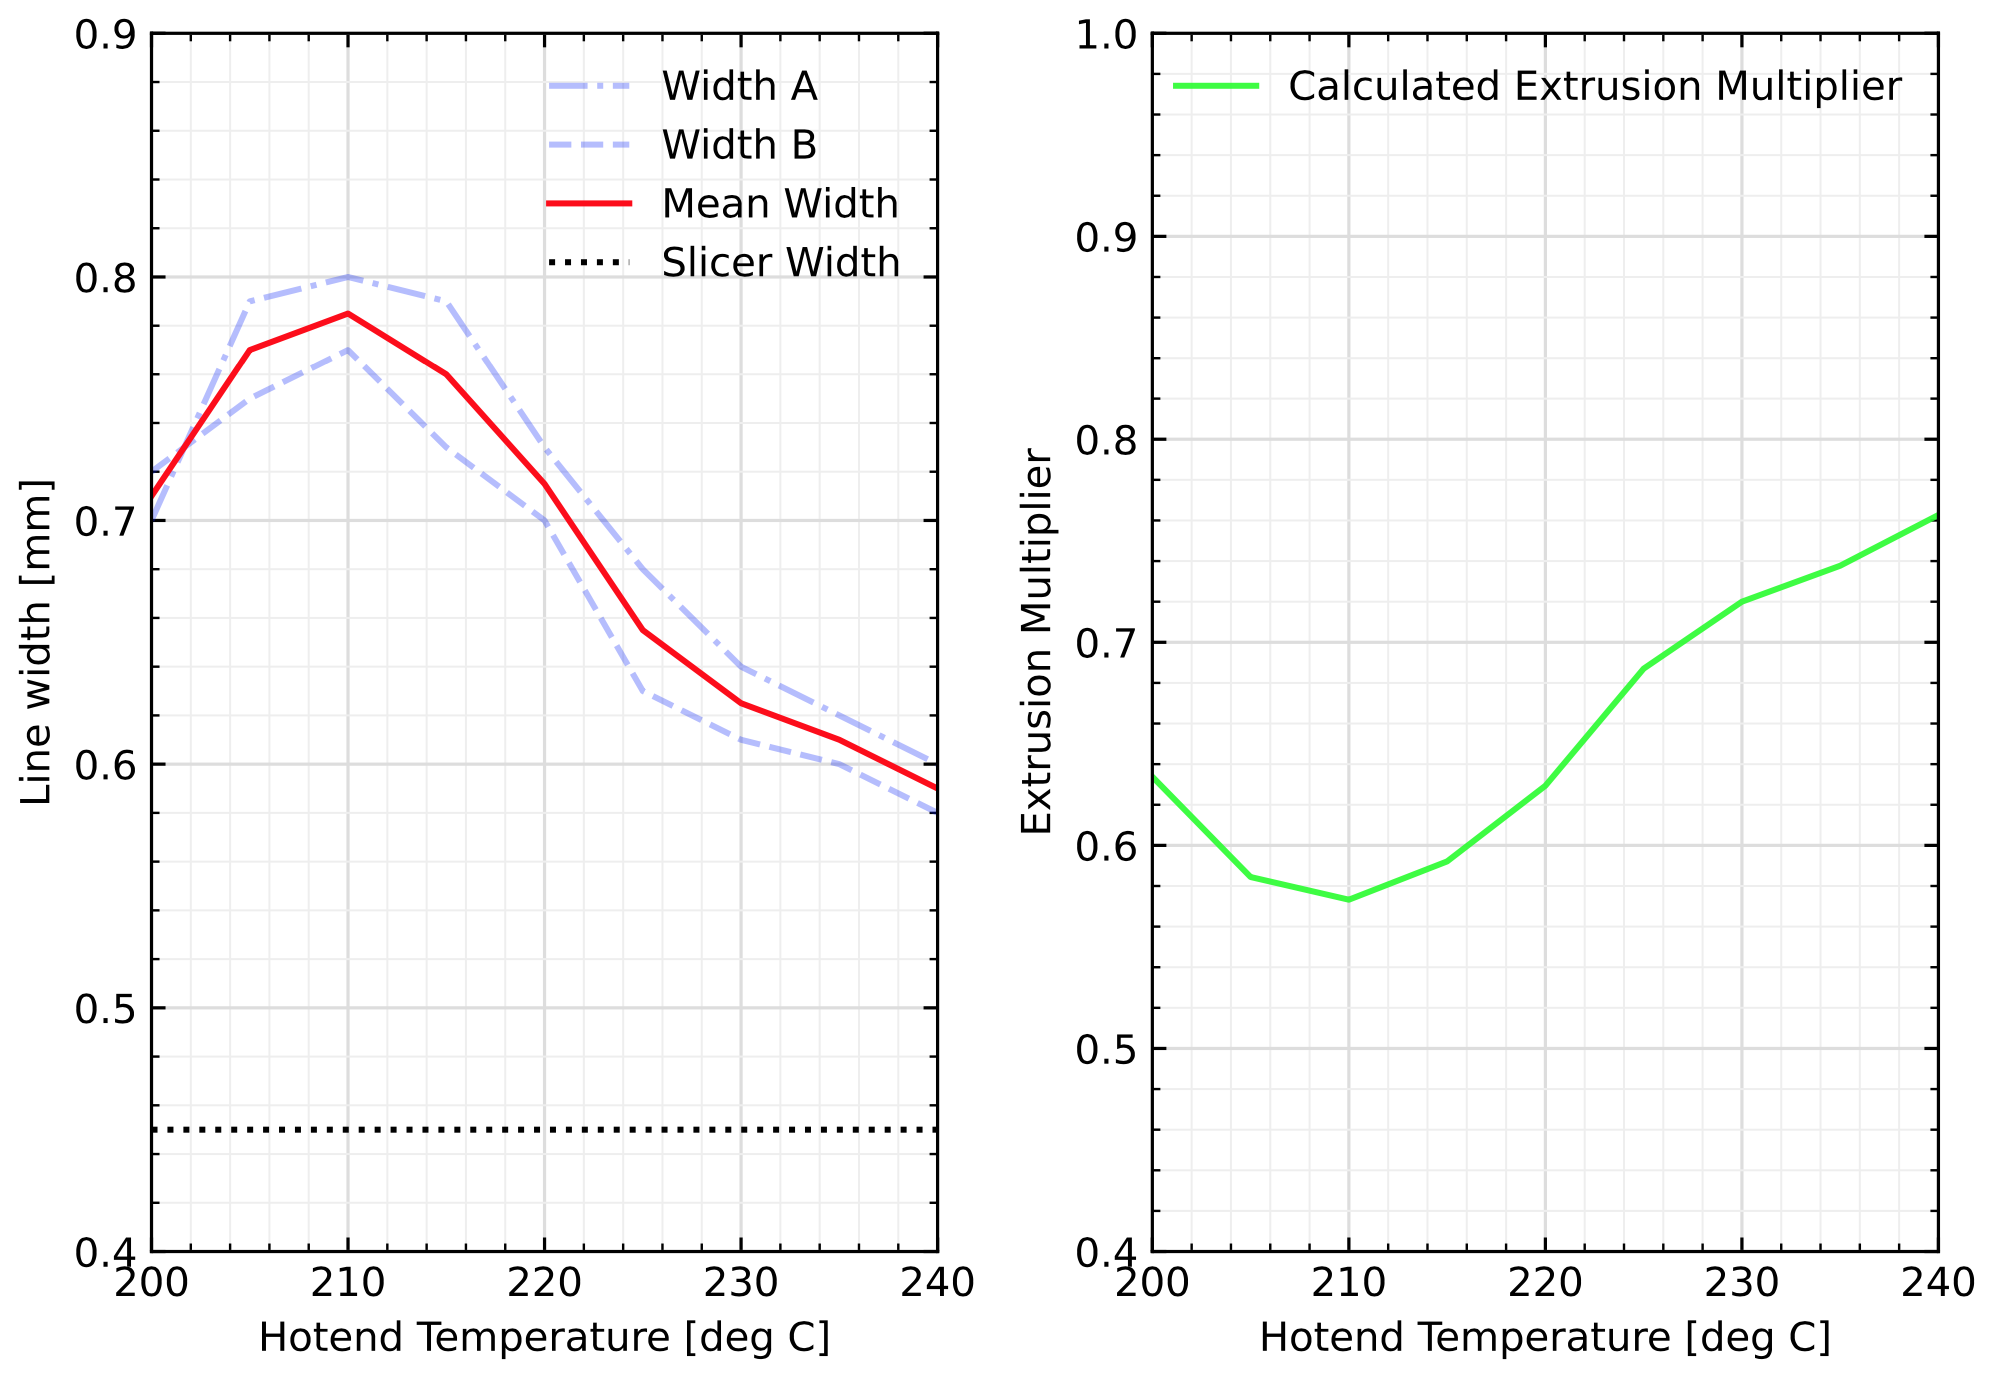 (a) Printed extrusion width as a function of hotend temperature, (b) Calculated extrusion multiplier to achieve the intended extrusion width as a function of hotend temperature
Choosing the optimum temperature is a compromise between desired strength, stringing, and print weight. Clearly, 210 degrees results in the lowest achievable weight since the lowest extrusion multiplier can be used. Print strength increases as temperature increases due to stronger intralayer bonding, and stringing is not a significant concern for my applications, so a final temperature of 220 degrees was chosen for further tuning. This results in single wall parts weighing about 9% more than if 210 degrees were used, but this is still a weight saving of almost 37% compared to non-lightweight PLA.
I further tested the susceptibility of extrusion width to extrusion multiplier at constant temperature as shown below. The response is approximately linear, so small adjustments to the extrusion width can be safely made my making minor changes to the extrusion multiplier.
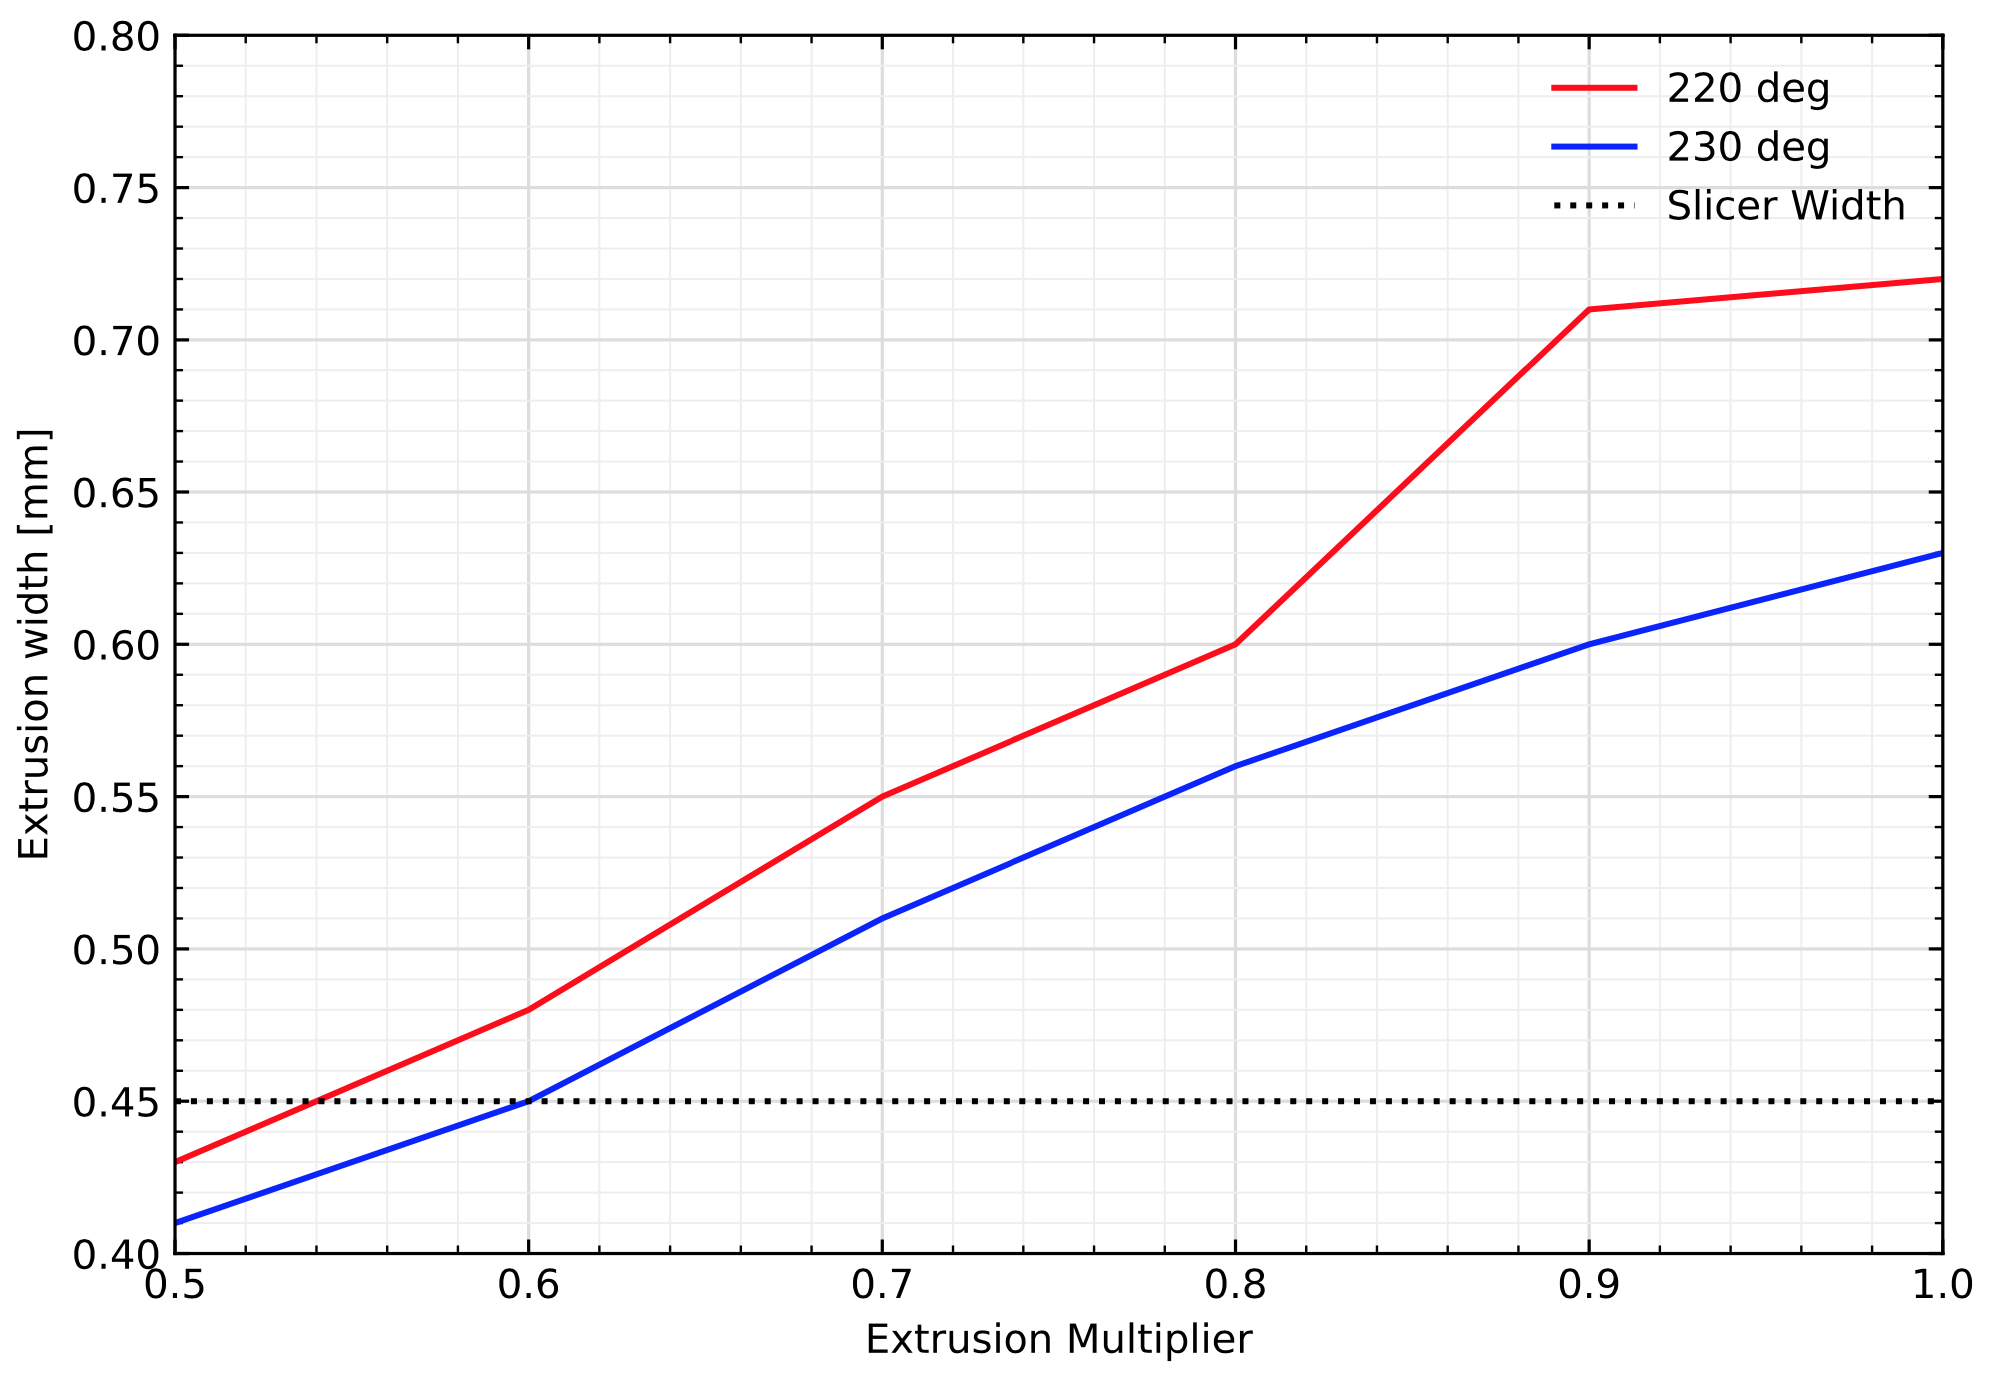 Printed extrusion width as a function of extrusion multiplier and hotend temperature
Print Speed
Print speed also affects the expansion ratio due to the change in extruder feed rate. I printed nine test specimens with a constant wall thickness of 0.45 mm and hotend temperature of 230 degrees, varying the print speed from 10 to 90 mm/s with an increment of 10 mm/s. I also repeated the test with an extrusion multiplier of 0.5 and 1.0.
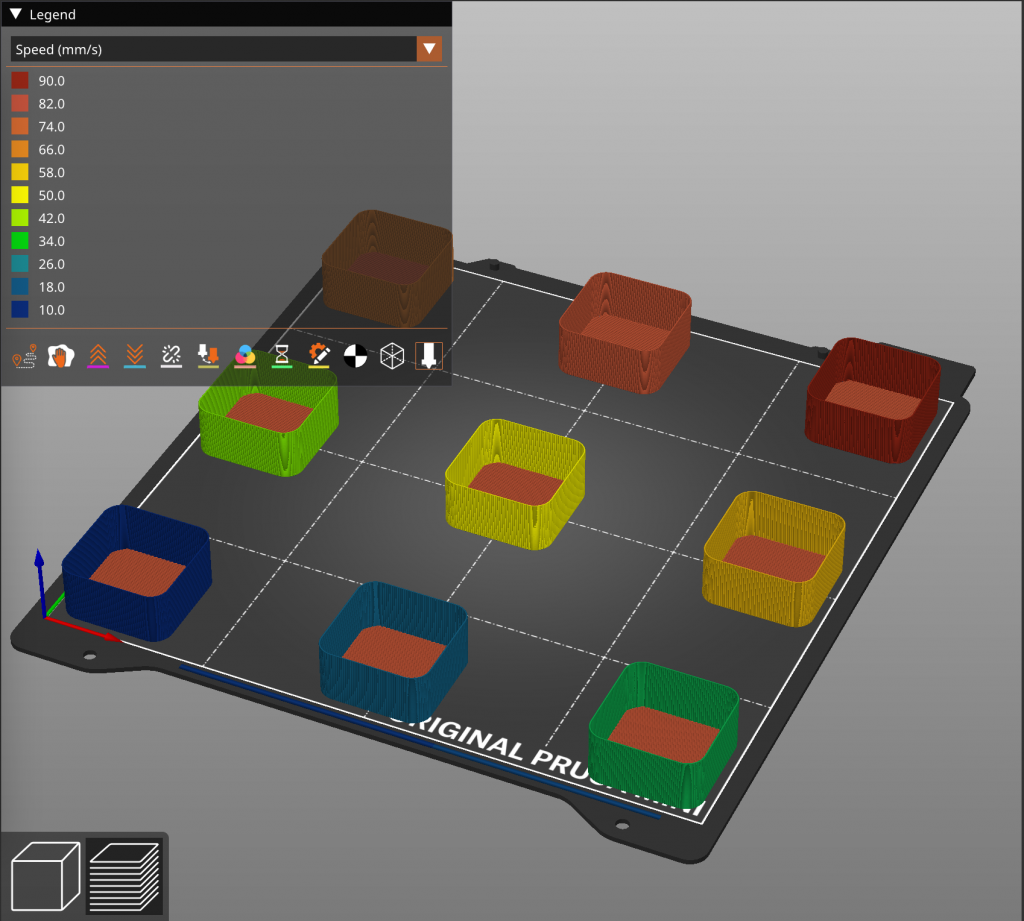 Slicer setup for multiple print speeds in a single print file
The results are displayed below and show that the expansion ratio tends to increase as print speed increases up to a maximum between 40-70 mm/s, before decreasing slightly depending on the extrusion multiplier. Clearly, the expansion ratio response has a strong dependency on the extrusion multiplier, with the lower multiplier increasing the expansion ratio at a smaller rate and becoming almost constant above a print speed of 40 mm/s. Although I didn’t capture evidence, the z seam suffered once print speed started to exceed 60 mm/s, where layer continuity was impacted and holes in the perimeter were created due to underextrusion on deretraction. This is particularly detrimental to single wall parts such as those printed witn this filament, so higher speeds are better avoided or retraction settings tuned to mitigate this issue. I used PrusaSlicer’s ‘deretraction extra length’ filament override setting with a value of 0.2 mm to compensate for the layer gaps caused by under-deretraction.
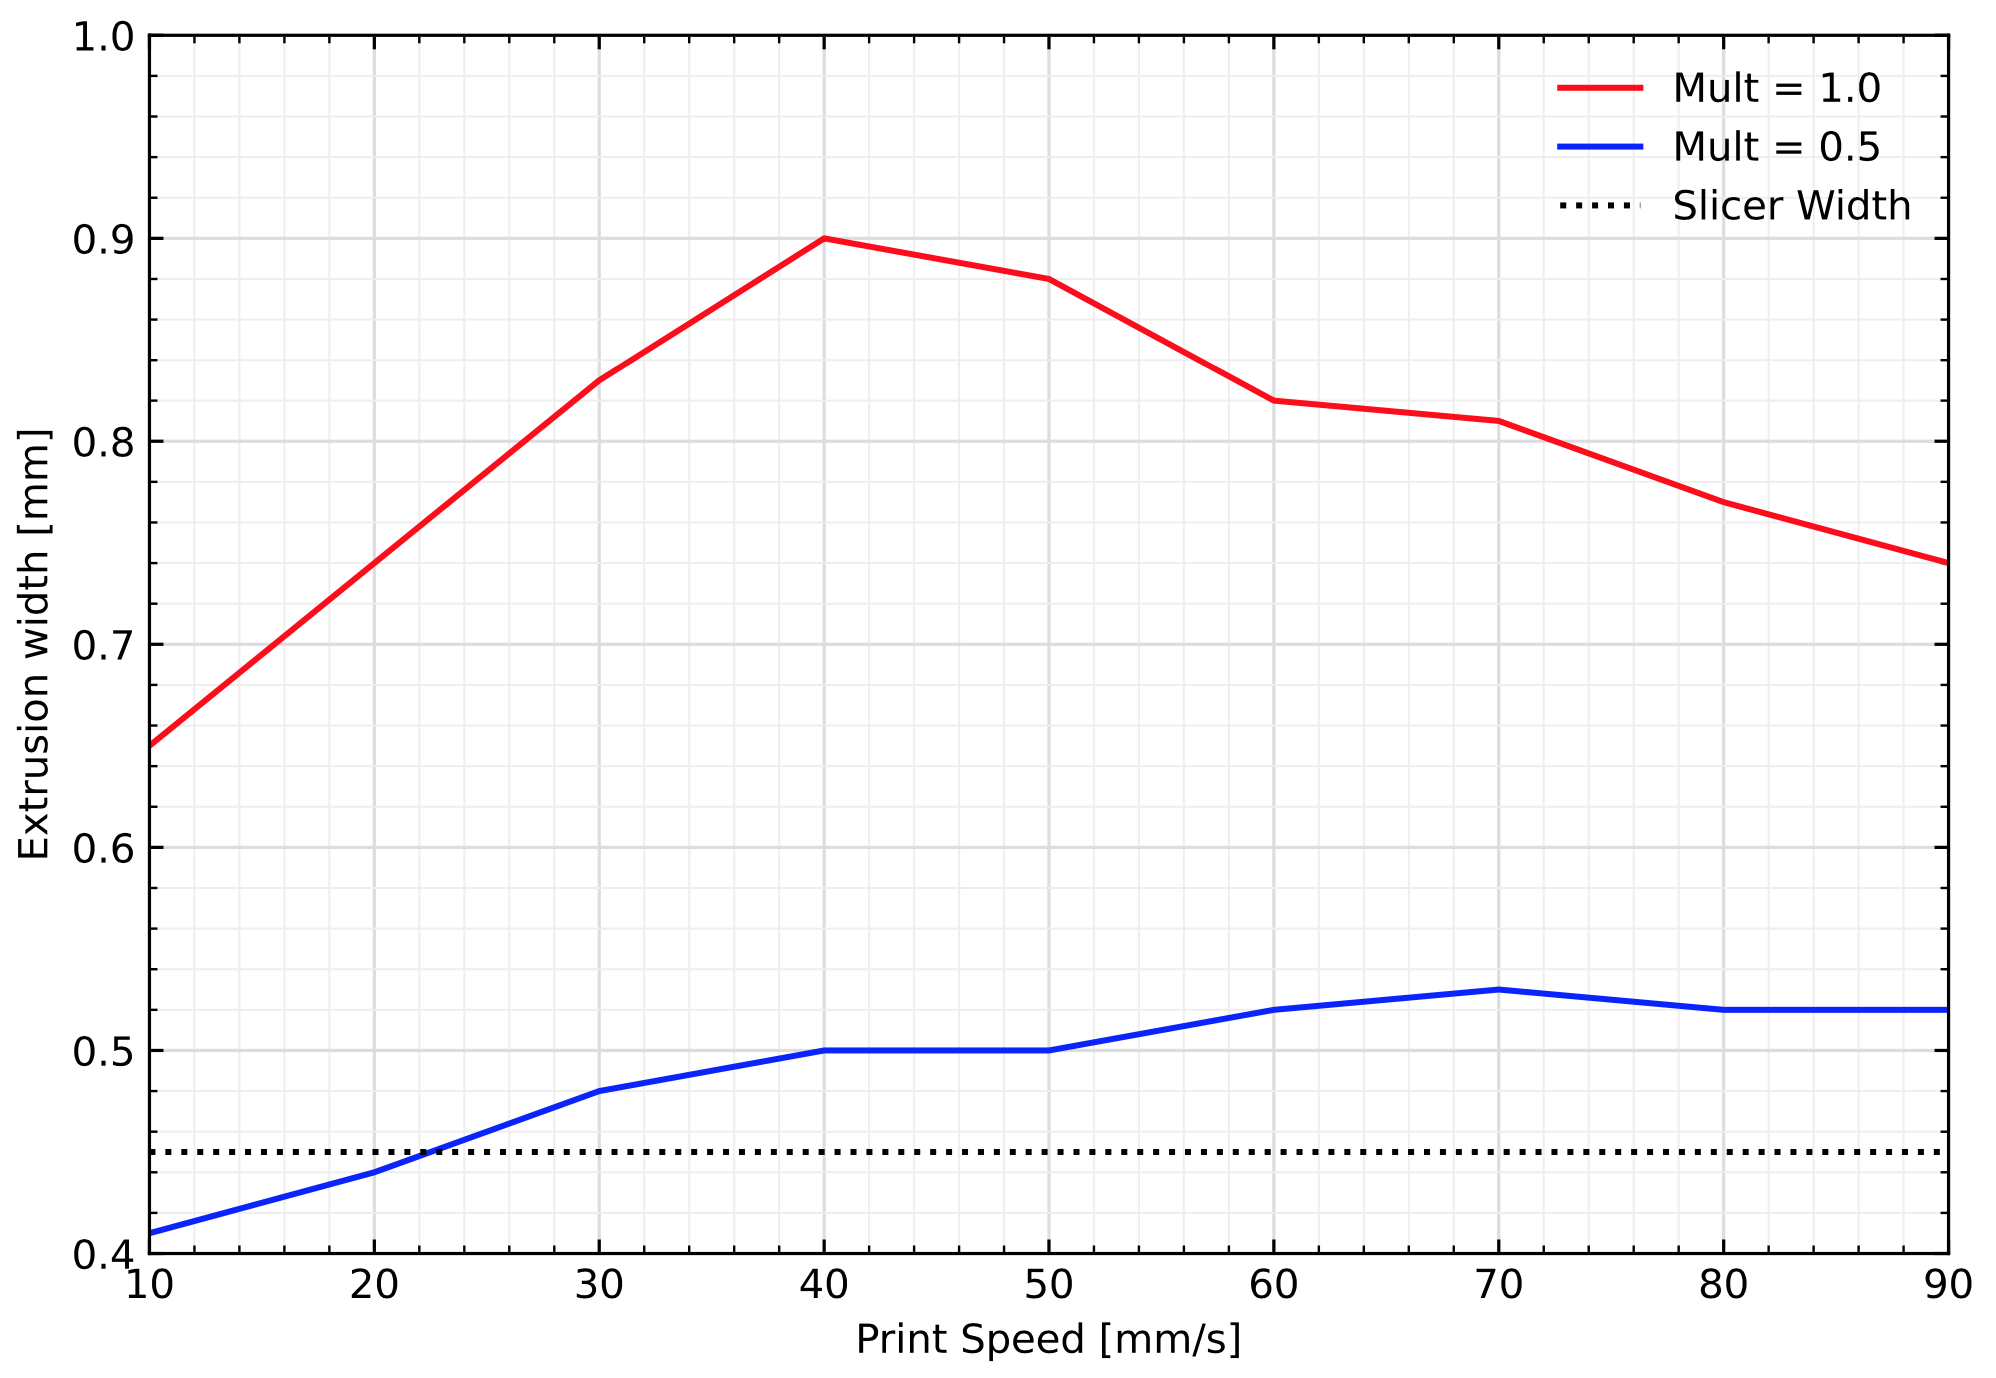 Extrusion width as a function of print speed and extrusion multiplier
Retraction settings
Due to the filament expanding in the nozzle, LW-PLA is prone to much greater oozing then standard filaments, causing retraction related artifacts such as stringing. Nozzle temperature is a key driver of stringing and the first step to reduce stringing is usually to reduce the nozzle temperature, however, we want to keep the optimal temperature determined above. We are therefore limited to adjusting the slicer retraction settings.
The Prusa Mini profile in PrusaSlicer uses default retraction/deretraction speeds of 70/40 mm/s respectively, and default retraction length of 3.2 mm, and these values are used for all tests unless otherwise stated. All tests below have both retraction and deretraction speeds overridden to the stated values.
Retraction Length
 Retraction length testing: Increasing left to right in increment of 1 mm, from 0 to 6 mm
Retraction Speed
 Retraction speed testing: Increasing from left to right. 2, 20, 40, 60, 80, 100 mm/s
 Detail view comparing retraction speeds of 2 mm/s (left) and 100 mm/s (right)
The impact of retraction length was minimal. Retraction speeds also had negligible impact apart from extremely slow speeds of 2 mm/s as shown above. However, this slow speed caused noticeable inconsistency in print quality, with significant under and overextrusion seemingly happening at random on a per-layer basis. Therefore, default retraction speeds were retained for the final print profile.
Final Settings
Following the chosen print temperature of 220 degrees, I selected a print speed of 40 mm/s and an extrusion multiplier of 0.63 to create dimensionally accurate printed parts. For retraction, I overrode retraction length to 4 mm to and included the ‘deretraction extra length’ of 0.2 mm to compensate for z seam underextrusion.
With these settings, parts can now be printed for future projects! These settings may not be perfect for every printer, but if you have a Prusa Mini and colorFabb LW-PLA they should serve as a good starting point.
